Scanning & Linking
Scanning Print Materials for Courses
Library staff can assist you with using the Library’s scanners to scan a book chapter, article, or other items that are not available digitally, but course instructors are responsible for the content they post in Brightspace—both in terms of copyright guidelines and Fair Use doctrine as well as the accessibility of the files they provide. If you must upload a PDF, be sure it has optical character recognition at a base level and headings/tags if it is a longer document.
Fair Use:
- No more than 20% of a work may be scanned and posted without permission (even for educational use). This means that you should not be scanning entire books, plays or other works
- We recommend that you place the entire book on physical library reserve even if you are only using a chapter or section of it
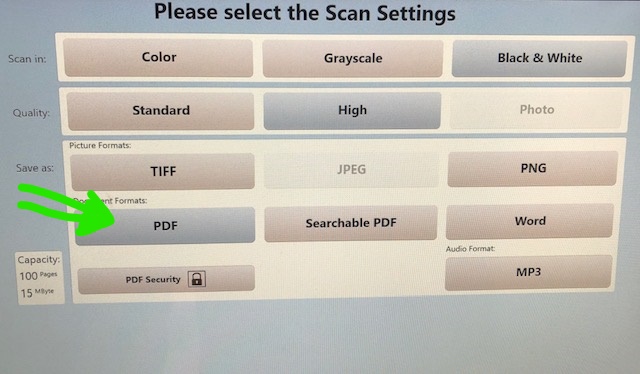
The Library has three large, touch-screen scanners (two in the Reference Area and one in the Music Collection)
With these scanners, you can:
- Scan to PDF, DOC (Microsoft Word), JPEG, or TIFF file formats
- Email the file to your Purchase email account or save it to a USB flash drive (but if you are doing more than 2 pages, use a USB—it’ll be faster and safer)
- Once the file is saved, you can upload the file to your course Brightspace provided that you add appropriate accessibility to it . All PDFs need adjustments (See Step 2 for more direction):
- Optical Character Recognition (OCR) ,
- Tagging for navigation
- Alternate text for images
- Headings for tables and data rows
STEP ONE: Scan carefully
- Scan from a CLEAN print copy (no, skewing, no markings, highlighting, shaded text, black gutters, etc.)
- If there is bleedthrough because of thin pages (you see dots from text on verso page), try placing a piece of black paper behind the page being scanned and scan as color.
- Scan only one page at a time—do not try to save time by pushing the spine to do two pages at once
- Be sure the reading order of the document is clear (that paragraphs aren’t located in an unusual way)
- Take a moment to crop out shadows, etc. so that the page is as clean as possible. Our scanners make this easy!
- Set higher quality—300dpi or above
- Scan to PDF image for use in courses (then address file accessibility issues as below)

STEP TWO: Bring up the file in Adobe Acrobat DC
From this program:
Clean out any dirt and shadows using the Edit tool. Then, check the overall accessibility of the file:
- Go to the Tools menu
- Choose Accessibility
- Run a Full Check on the file to Start Checking
- Open the Documents drop-down
- Click on the first X item (you may see a Red X)
- Choose the drop-down Fix menu and choose Fix for each of the problems you can
At a base level, your file is now much more usable by a variety of users.
STEP THREE: Going the distance for long-term, wide use
You can go a step further to ensure ultimate access by:
- Correct the tagging that Adobe did “automatically” when you used the “Fix” function. Sometimes, it does not properly discern sections, etc. You can fix that as well as the images/tables/graphs that need alternate text
- You can correct the “suspected” bad interpretation of words. Sometimes, this software will read W as \V depending on the font variations. You can close the accessibility menu, Choose to Enhance Scans, Choose Recognize Text (in this file), hit Recognize text, and then pull down the Recognize Text dropdown to Correct Recognized Text. Your screen will have suspected issues outlined in a red box.
Linking to Content in Brightspace
Work with your subject liaison in order to locate electronic versions of your course materials.
Always link as directly as possible to the source—it covers both copyright and accessibility standards.
- If you are using an article from a database, create a link to the article WITHIN the database.
- DO NOT download and re-upload a PDF from a database (you will lose out on accessibility upgrades to the file made over time)
- If you need help making the link accessible to those off-campus so they can log in, please see the FAQ on Linking to a Database Article.
Canon Copier/Scanners: Soc. Sci, Music, Theatre Arts, Nat Sc
Canon allows you to easily scan your items in OCR/Searchable Text. Please follow these directions:
- Hit the button for “Main Menu” to the left of the main screen
- Choose “Scan and Store” (or “Scan and Send” though this is not recommended as these files are large)
- Memory Media Card (thumb drive or USB drive)
- Click file format [normally, it is set to PDF (Compact)]
- Save and send the file
- Bring file into Adobe Acrobat DC to ensure Optical Character Recognition or OCR accessibility at a MINIMUM—see STEP TWO above